Cómo decorar con galletas previamente horneadas

How to decorate with previously baked cookies.

ilove2

Si alguna vez habéis intentado encajar un trocito de masa coloreado dentro de otro sin colorear, estas galletas os habrán parecido la obra de la catedral de Milán, pero no lo son. Se hacen en un momentín, os cuento cómo.

If you have ever tried to fit a little piece of coloured dough into another one that is not coloured, you will think of these cookies like a work similar to the Cathedral of Milan, but they are not. They can be made in no time. I will tell you how.

ilove1

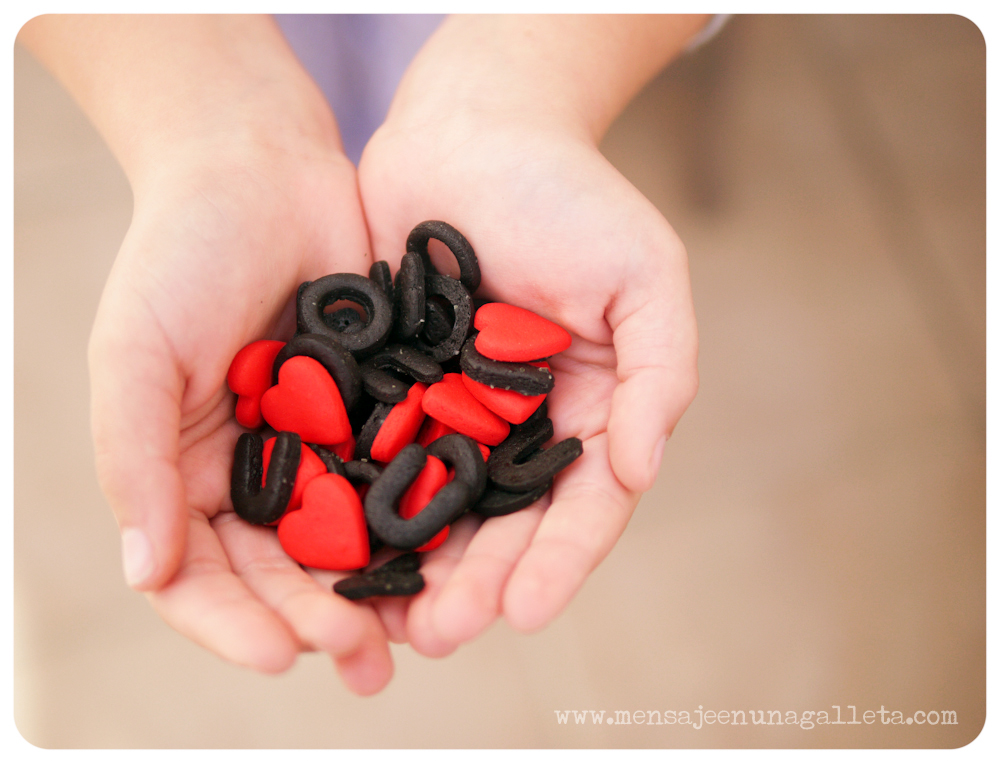
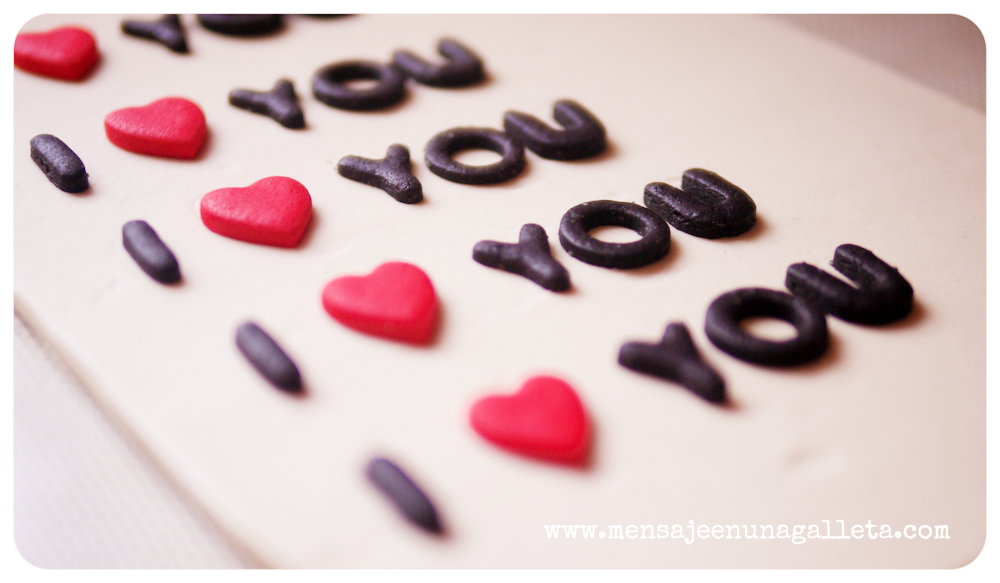
Primero hacemos galletas pequeñas. Coloreamos la masa, la estiramos fina, de unos 2 mm de grosor, marcamos las letras y los corazones. Enfriamos. Con la masa bien fría “desmoldamos” las mini galletas y las horneamos dos veces. Fin del trabajo duro.

First of all we make small cookies, colour the dough, roll it out thinly, about 2 mm thick, mark the letters and hearts. We put them in the fridge. When they are really cold, we remove them from their moulds and bake them twice. End of the hard work.

galletas

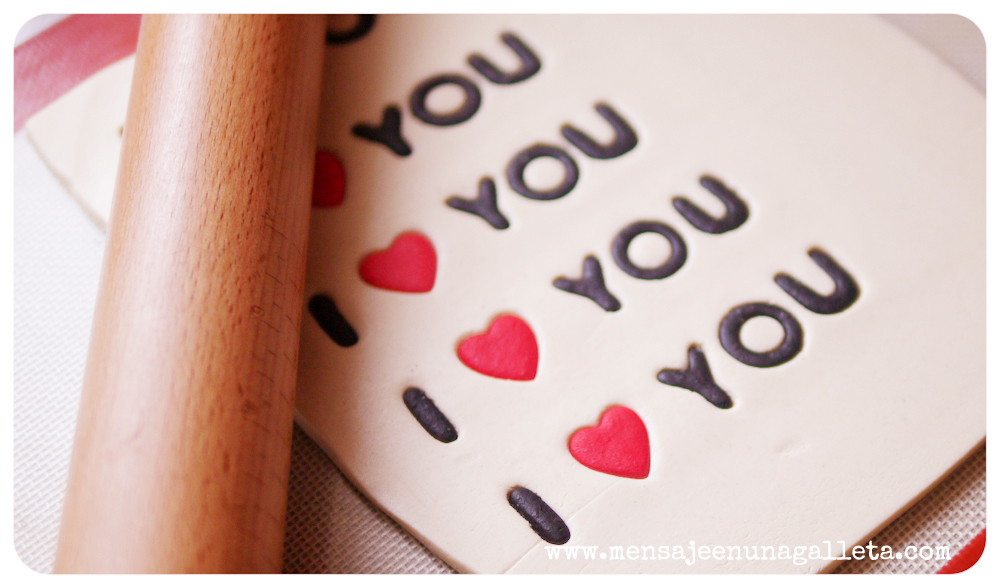
Estiramos la masa sin colorear con un grosor de 5 ó 6 mm, y colocamos sobre ella nuestras galletas:

We roll out the non coloured dough about  5 or 6 mm thick, and place our little cookies on them:

lascolocamos


A continuación apretamos con el dedo para hundirlas. Esto desplaza la masa sin colorear hacia arriba y hacia los lados, así que con mucha suavidad le pasamos el rodillo para volver a nivelarla. Con mucha suavidad, para no partir las galletas horneadas.

Next, we press them with our fingers to dip them into the dough. This will move the non coloured dough upwards and to the sides, and we will level it again with the rolling pin very carefully so we do not break the baked cookies. 

rodillo

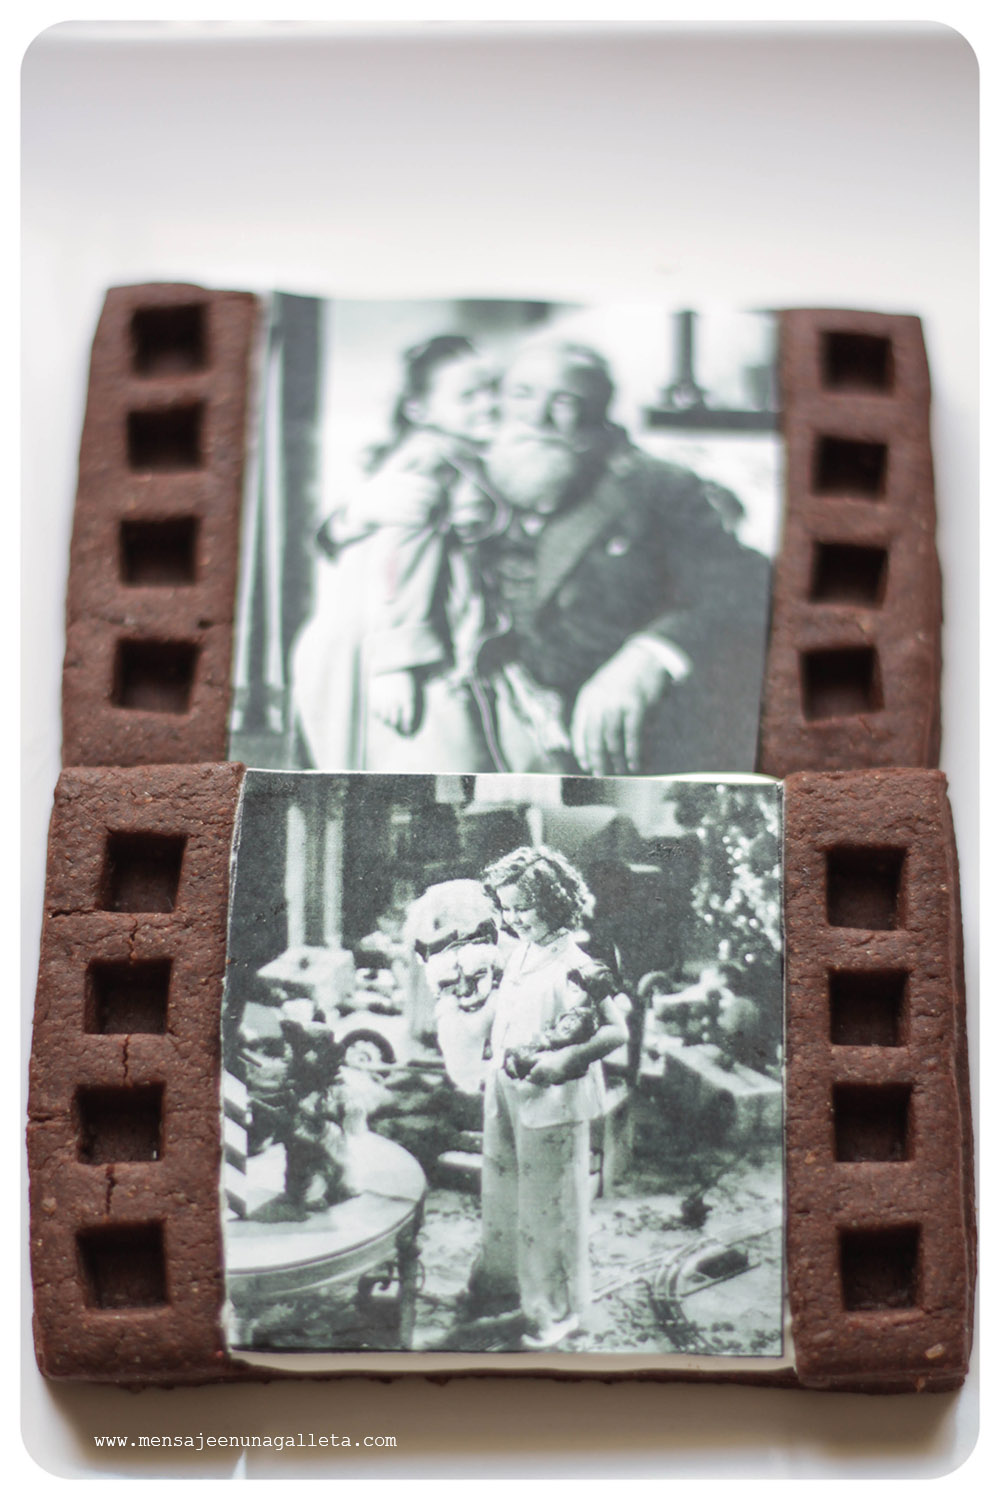
Enfriamos la masa, cortamos y horneamos. Éste es el resultado:

We will chill the dough again, cut and bake. This is the result: 

iloveu3

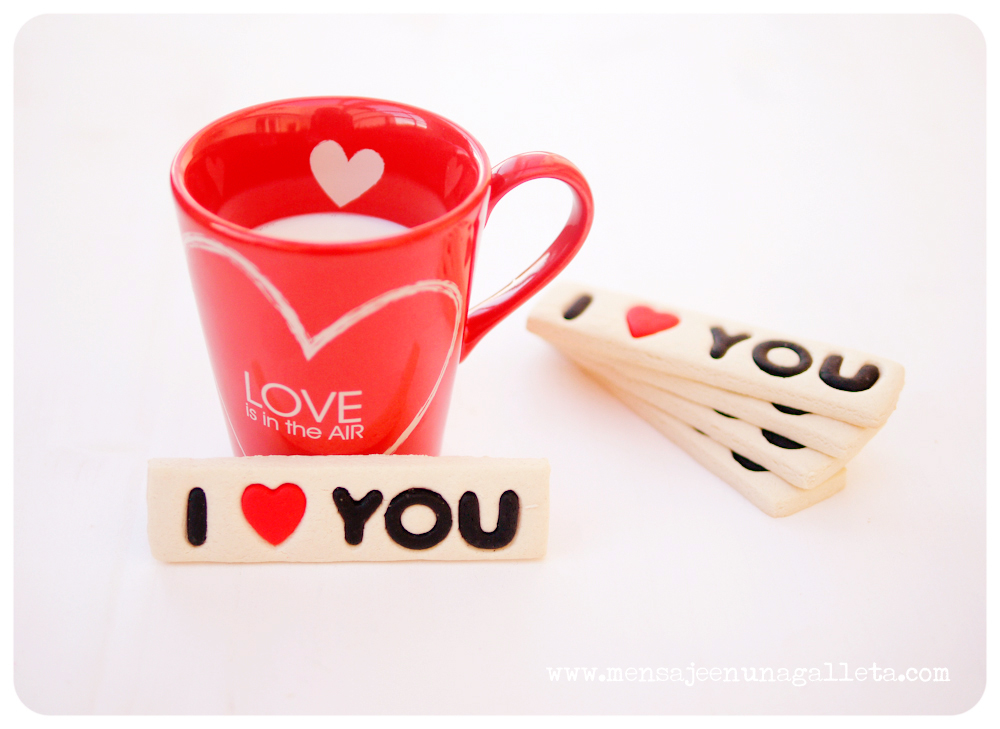
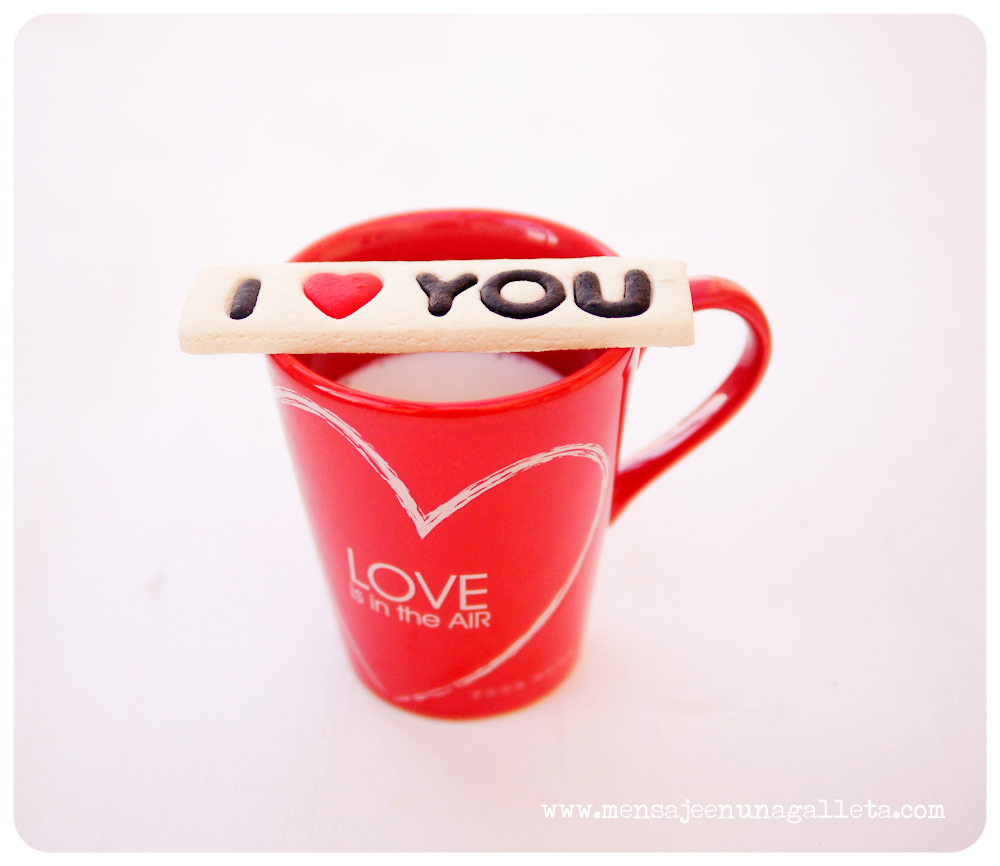
¡Sí, lo sé, es increíble! ¡Hemos hecho galletas con mensaje!

Un beso, Miriam G.

(Nota: Los tapete son de Ibili, la relación calidad precio es inmejorable, los podéis encontrar en Mummy crafts.)

I know, it’s incredible!!! We have made cookies with a message!!!

Love, Miriam G.

(Note: the silicon baking mat is from Ibili. The quality-price value is unbeatable, you can find them Mummy crafts.)

P.S.: once again… thank you Gloria!

«Holy-wood» Christmas cards


Después de tanto rojo, hemos cambiado de tercio con unas galletas de chocolate de impresión comestible (ya hacía tiempo que no poníamos en funcionamiento la impresora). Como eran con fotos navideñas de actores de Hollywood a Miriam se ocurrió hacer un nuevo diseño para «enmarcar» las fotos, en forma de fotograma.

After all that red, we change the subject to some edible printed chocolate cookies (as we have not used the edible printer for a while). The images to print were Christmas pictures from Hollywood actors, and Miriam thought of a new design to ‘frame’ the cookies, as if they were photograms.

Con un cortador cuadrado pequeñito con expulsor de los de fondant se sacan los cuadrados de unas tiras de masa y se superponen encima del rectángulo grande. Una vez horneado todo el conjunto, se rellena con una capa de glasa y se pega encima la pasta de azúcar con unas gotitas de sirope claro de maíz.

Using a small squared fondant cookie plunger cutter, we take out the squares from a strip of dough and place them on the big rectangle. Once the whole set has been baked, it is filled with a royal icing layer on which we glue the edible printed images using a few drops of light corn syrup.


En este audio podéis oir en la radio a los Cowboys de Medianoche (Luis Herrero, José Luis Garci y Luis Alberto de Cuenca) cómo adivinan los nombres de los actores de las galletas de las postales de Navidad que les mandamos y ¡cómo se las comen! ♥. El momento es a la hora y 21 minutos del programa

Un beso,

Love,

Miriam y Estíbaliz

PS: We love both of you, Gloria and Mª Jesús

Como conseguir que el 2013 sea un año brillante – How to turn 2013 into a shiny year

Echándole brillantina. 😉

Los polvitos brillantes para repostería los podemos clasificar en dos grandes grupos:

· Brillantina comestible – O para ser exactos no tóxica. Suele venir en botecitos pequeños y en esos botecitos lo que pone es Disco Dust. Para los números y el confeti he utilizado un azul irisado.
· Brillo comestible – Es parecidísimos a la sombra de ojos, pero la presentación es en polvo suelto en lugar de compacto. También vienen en botecitos y lo que suele poner es Luster Dust. •Para las letras y las burbujas de champan (sí, son burbujas de champán) he utilizado un tono arena metálica dorada, no yo no le puesto el nombre.

Adding glitter.

· Edible glitter – or to be exact, non toxic. It comes in small containers reading Disco Lust. For the numbers and confetti I have used an iridescent blue.

· Edible sparkle – it is very similar to an eye shadow, but instead of being compact, it comes in a loose powder format. You will also find it in small containers reading Luster Dust. For the letters and champagne bubbles (yes, they are champagne bubbles) I have used a metallic golden sand shade (sorry, I have not chosen that name).

En la red podéis encontrar muchos tutoriales de diferente calidad, que explican cómo aplicarlos sobre glasa o fondant. Yo os voy a contar como utilizarlos directamente sobre masa de galletas.Lo ideal es que la masa de la galleta sea de un tono parecido al del brillo que vamos a utilizar. Así que teñí parte de la masa de azul como explico aquí. Y otra parte de un color ocre que conseguí mezclando muy poco de marrón con mucho de amarillo huevo.Para aplicar los brillos tenemos que acariciar la galleta con suavidad. Como esto lo hacemos con los dedos y parece que no queda muy bonito meterlos dentro de bote, echamos un poco en un trozo de papel de horno, impregnamos bien el dedo y acariciamos la galleta. Para las brillantinas el proceso es casi el mismo, brillantina al papelito, brillantina al dedo y después en lugar de de caricias golpecitos. Creedme no necesitáis nada más, se pegan.

On the Internet you can find a lot of tutorials of different quality, explaining how to apply them on royal icing or fondant. I am going to tell you how to use them directly on cookie dough.
The ideal is to have a dough in a similar shade of the dust we want to apply. I dyed part of my dough blue as I explain here. And another bit I dyed it ochre mixing a little bit of brown with a lot of egg yellow colour.
To apply the Luster Dust we have to softly caress the cookie. As we do this with our fingers and it does not seem right to stick them in the container, we spread a bit of dust on a sheet of kitchen wax paper, coat a finger properly and then caress the cookie. For the Disco Lust the process is almost the same, spread it on the paper, coat the finger but instead of caressing the cookie, we will go for little taps. Believe me, you will not need anything else, dust will stick to the cookie.

Sí os fijáis, los laterales de las galletas también brillan.
Después sólo tenemos que colocar las galletitas encima de las galletas y al horno. No hace falta ponerles nada a modo de pegamento, en el horno se unirán con el calor.
La brillantina, como todas las madres sabemos, sea del tipo que sea, tiende a ocuparlo todo, así que cuando vayáis a colocar las galletitas que la llevan os recomiendo que lo hagáis con muchísimo cuidado.

If you notice, the sides of the cookies are also shiny.
Afterwards we will just have to place the tiny cookies on top of the cookies and bake them. No glue will be necessary, in the oven they will stick to each other with the heat.
Glitter, whatever type it is, as we all (as mothers) know, tends to cover everything, so I heartily recommend you to place the tiny cookies with extreme care.

¡Feliz 2013!

Happy 2013!

Un beso gordo, Miriam G.

A big fat kiss, Miriam G.

P.S.: once again… thank you Gloria!

Rojo Navidad – Christmas Red

A ver, ¿por qué roja? ¿Porque simboliza la sangre de Cristo? ¿Porque antiguamente la gente decoraba los árboles con manzanas rojas? ¿Porque la flor de pascua es roja? ¿Porque así crearon a Papá Noel los de Coca Cola? ¿Porque la nariz de Rudolph el reno es roja?

Let’s see, why red? Is it because it symbolises Christ’s blood? Because people in the old days used to decorate their trees with red apples? Because poinsettias are red? Because that’s the way the guys from Coca Cola designed Santa? Because Rudolph’s nose is red?

Mientras resolvemos esta gran duda existencial, sobre lo que no hay duda es acerca de cómo conseguir galletas completamente rojas y perfectas 😉 Por si alguien no lo sabe todavía, aquí tenéis la receta y aquí cómo conseguir el color.

While we try to solve this universal mystery, what people have no doubt is about how to get perfect and completely red cookies 😉 In case you don’t know this yet, here you have the recipe and here is the trick for getting the color.

Encima les puse unos detallitos con glasa bien sencillos y han quedado muy resultonas. I put a little royal icing details on top of the cookies and they have turned out very cute:

Galletas que fueron devoradas literalmente en directo en esRadio. These cookies were literally devoured live on air in esRadio:

Primera parte – First part

mmmm…¿y el color verde? and the green colour?

As usual: Thank you Gloria!

Un beso,
Love,
Estíbaliz

A ver, ¿por qué roja? ¿Porque simboliza la sangre de Cristo? ¿Porque antiguamente la gente decoraba los árboles con manzanas rojas? ¿Porque la flor de pascua es roja? ¿Porque así crearon a Papá Noel los de Coca Cola? ¿Porque la nariz de Rudolph el reno es roja?

Let’s see, why red? Is it because it symbolises Christ blood? Because people in the old days used to decorate their trees with red apples? Because poinsettias are red? Because that’s the way the guys from Coca Cola designed Santa? Because Rudolph’s nose is red?

Mientras resolvemos esta gran duda existencial, sobre lo que hay duda es acerca de cómo conseguir galletas completamente rojas y perfectas 😉 Por si alguien no lo sabe todavía, aquí tenéis la receta y aquí cómo conseguir el color.

While we try to solve this universal mystery, what people have doubts is about how to get perfect and completely red cookies 😉 In case you don’t know this yet, here you have the recipe and here is the trick for getting the color.

Encima les puse unos detallitos con glasa bien sencillos y han quedado muy resultonas. I put a little royal icing details on top of the cookies and they have turned out very cute:

Galletas que fueron devoradas literalmente en directo en esRadio. These cookies were literally devoured live on air in esRadio:

Primera parte – First part

mmmm…¿y el color verde? and the green colour?

As usual: Thank you Gloria!

Un beso,
Love,
Estíbaliz