Antes de empezar el post quiero hacer una advertencia: LAS PERSONAS QUE PADEZCAN DEL CORAZÓN, DEBEN ABSTENERSE DE HACER ESTE ÁRBOL. Durante la realización del mismo se producen episodios de mucho estrés y llantinas, y no todos los corazones pueden soportar tal carga emocional. Efectivamente, lo pasé fatal.
Ahora ya puedo continuar con el post. Si estáis decididos a hacerlo tendréis que agenciaros los siguientes materiales:
- Cucuruchos de helado, como ya os habréis figurado.
- Papel de horno o bolsas para galletas de tamaño suficiente como para cubrir el cucurucho
- Glasa madre con 65 ml de agua, en vez de los 70 para que, al añadirle el colorante, siga siendo espesa (vamos a trabajar con la fuerza de la gravedad en nuestra contra y no queremos que el diseño termine siendo un churro)
- Boquilla del 4, para que las decoraciones sean más robustas
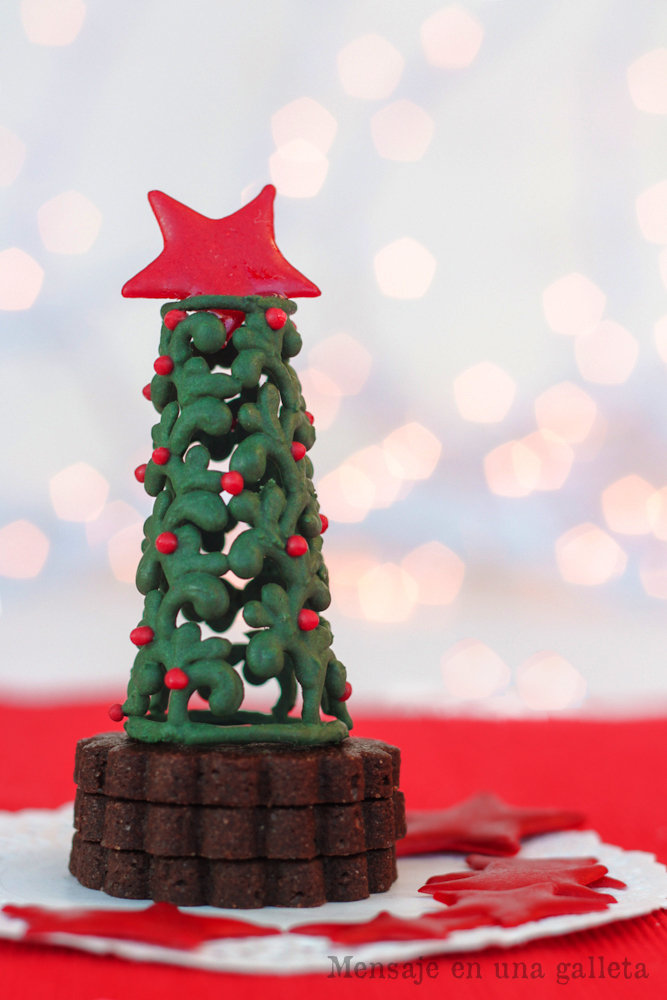
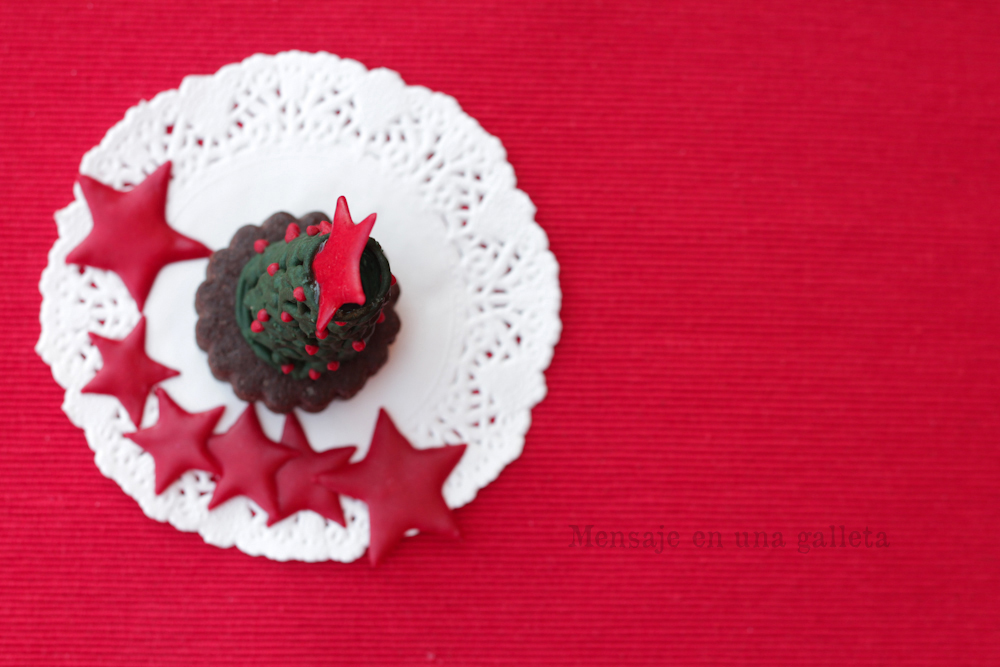
- Una peana de galletas para que el árbol luzca como se merece, incluso encima de unos macarons también tiene que quedar precioso
- Sirope claro de maíz para pegar la estrella
Empezamos recortando los cucuruchos, los que yo conseguí no tenían el borde igualado así que los corté, primero con un cuchillo de sierra y luego con otro de borde liso para terminar de pulirlos. Esmeraos en esta parte porque un cucurucho «cojo» se tumba fácilmente.
Después recortamos el papel de horno (o la bolsa de galletas) y envolvemos con él el cucurucho pegándolo al principio y al final con esa glasa que ya tendremos lista. Y ya podemos comenzar a decorar.
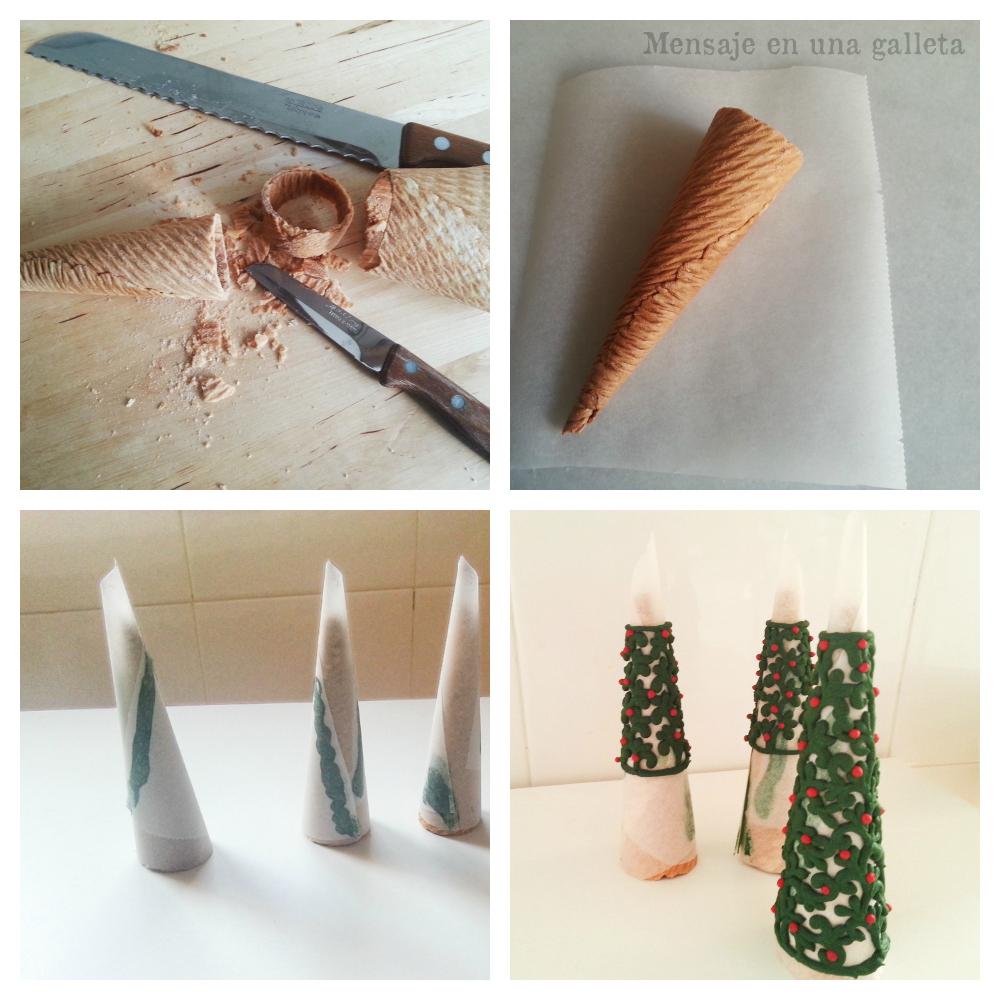
No cometáis el mismo fallo que yo y os entusiasméis decorando el cono hasta abajo porque luego no hay quien lo maneje y se pasa muy mal intentando no tocar ninguna de las decoraciones. Por cierto, intentad que queden pegadas unas con otras para darle más solidez al árbol.
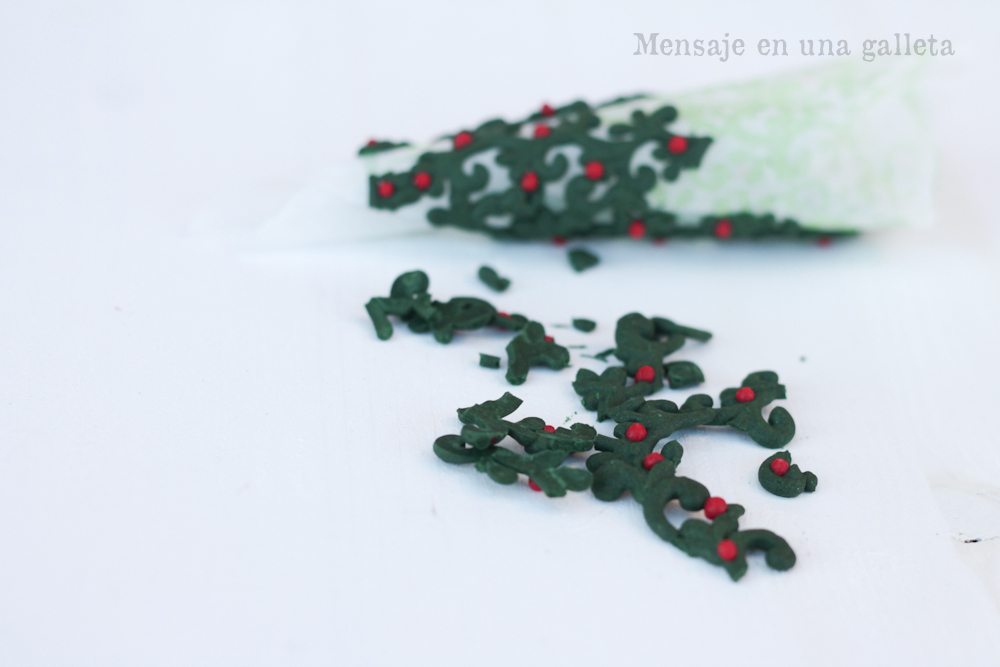
Sigamos. Al día siguiente ya sabía que los arbolitos estaban secos, pero fui dilatando el tema del despegue (y no me refiero a aviones) buscándome otras tareas caseras para no «enfrentarme» a ellos. Cuando ya no tenía más excusas me atreví a sacar el cucurucho de helado, eso estaba chupado. Ahora llegaba lo verdaderamente estresante: despegar el papel de horno, con mucho cuidado, ya os lo habréis imaginado. Pues a pesar de todo el cuidado del mundo, aquello terminó en tragedia:
No pasaba nada, tenía todavía dos oportunidades más, que terminaron siendo una sola ¡qué estrés! Pero mirad por dónde las musas vinieron a visitarme y se me ocurrió ayudarme de un palo de brocheta para despegarlo todo.
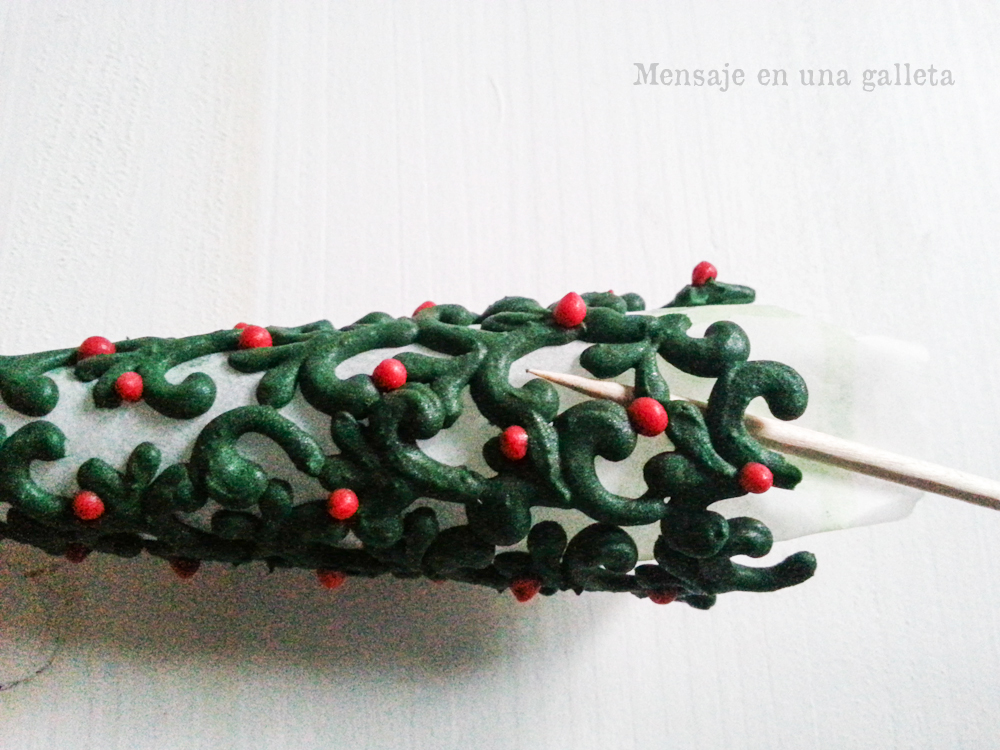
Fui introduciendo el palo entre la glasa y el papel y aplastándolo contra el eje del cono, suavemente pero pulso tembloroso… Y aquí es donde viene la llantina porque no podía creerlo ¡se había despegado entero! ¡y sin romperse! ¡qué alivio! Menos mal que era la hora de la siesta y nadie me vio ¡lo había pasado tan mal!
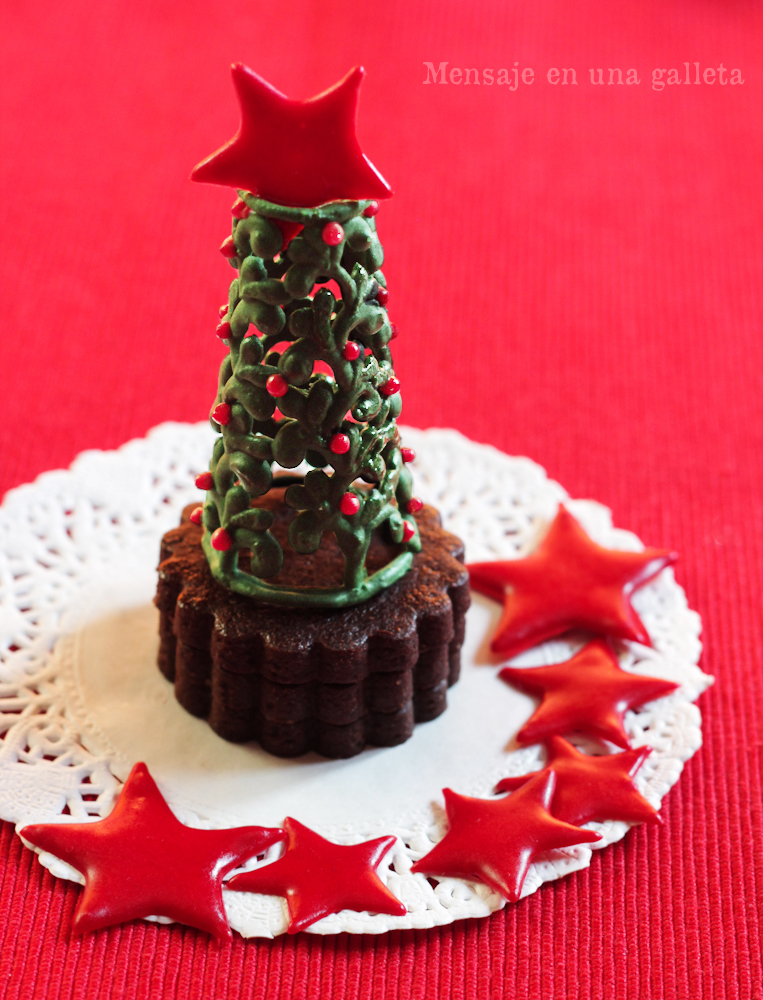
Ahora ya todo era cuesta abajo, le pegué la estrella (un transfer de glasa) con un poco de sirope de maíz y di por cumplida la misión ¡Qué alegría!
Un beso,
Estíbaliz
P.D.: Muchas gracias, Gloria. No la dejamos descansar ni en Navidades
Before I start I want to add a word of caution: people suffering from heart disease must refrain from making this tree. During its elaboration you may sob, suffer stress episodes and not every heart can cope with such emotional burden. Yes, I had a rough time.
Now I can keep writing the post. If you are determined to make this tree you will need the following materials:
- Ice cream cones, as you may have imagined.
- Parchment paper or cookie bags big enough to cover the cones
- Royal icing made using 65 ml of water instead do the usual 70, so when we add the food colouring it’s still thick (we are going to work with gravity against us and we do not want our design to end up being a disaster)
- Tip #4 so the decorations are more robust
- A base of cookies so the tree looks as it deserves to do so, even on top of some macarons it may look fantastic
- Corn syrup to glue the star
We start by cutting the cones, the ones I got didn’t have even edges so I cut them, first with a serrated knife and then with a blunt one to make them smoother.
Then we cut the paper (or the cookie bag) and wrap the cone with it, using some RI to glue it. Now we can start decorating.
Do not make my very same mistake and get too excited decorating the cone to the bottom, as later on there will be no way for you to manipulate it and it’s really stressful trying not to touch any decoration. And speaking of decorations, try to glue them together so the tree gets more solid.
Let’s continue. Next day I knew the trees were dry, but I delayed the take off moment (and I’m not talking about airplanes here) looking for some other home errands so I didn’t have to ‘face’ those trees. When I ran out of excuses, I dared to remove the cone. That was easy. Now he next step was tricky: taking the parchment paper off. Well, in spite of me being extremely careful, it ended up being a tragedy.
Ok, it was fine, I still had two more opportunities, which turned into just one. How stressful! But just like that, muses came to visit me and I thought about using the help of a skewer to remove the paper.
I introduced the skewer between the RI and the paper and pushed it against the cone’s axe, very softly and with a trembling pulse…and here is where the sobbing appears, I couldn’t believe it! It came off completely and without breaking! What a relief! Thank God it was siesta time and no one saw me, I’d had such a hard time!
Now it was all down the hill, I glued the star (a royal icing transfer) with a bit of corn syrup and then it was mission accomplished.
Love,
Estíbaliz
P.S.: Thank you very much, Gloria We don’t even let her rest on her holidays
A mi me pasó algo parecido pero haciendo globos de filigrana de chocolate y se por lo que pasaste.
Seguro que quedaron preciosos.
Un beso y gracias por tu comentario
Precioso y muy original. enhorabuena por tu trabajo y ¡Feliz Navidad!
Precioso, como siempre. Feliz Navidad a ambas! Beso gordo.
Creo que mi paciencia no da para tanto, jajajaja
Muy buen trabajo
Felices fiestas
Gracias por compartir tus conocimientos y tus «sufrimientos» para realizar algunos de tus trabajos; eres muy generosa. El arbolito quedó precioso, mereció la pena tanto esfuerzo. Feliz Navidad! un beso.
Que preciosidad!!
Es realmente hermoso… cuanto tiempo y esfuerzo empleado.
Gracias por compartirlo.
Un abrazo y felices Fiestas!!!
Valió la pena el esfuerzo, las llantinas y el estress porque te ha quedado precioso! Muy original un besote
Increíble!!! Son preciosos!!! Me he estresado leyéndolo… creo que lo probaré de hacer en algún momento relajado que tenga…. verano? cuando me haya tocado la lotería? ;))))
Un beso chicas!!
Tremendooooo! Feliz Navidad a las dos ! Cacho GUAPAAAA!
Madre mía !!! Yo no padezco del corazón afortunadamente, pero de momento me voy a abstener de intentar algo así y me voy a limitar a disfrutar de vuestro trabajo. Menuda obra de arte, si algún día saco valor para hacer algo así os lo dedicaré. Seguid así, siempre sorprendiendo. Besitos.
¡Feliz Navidad!
¡Muchas gracias, por enceñarnos! Es muy original y bonito
Increible
¡Muchas gracias chicas! Nos encanta que vengáis a vernos al blog
¡Feliz Navidad para todas!
Un beso muy grande
Wow! que bonito ha quedado! comprendo el miedo al despegarlo madre mía que nervios!
Genial como siempre