Una receta de pan con pimientos asados (no cualesquiera) – A bread recipe with (not just any) roasted peppers.

cestapanes

Adoro cuando Miriam se va a Ponferrada de vacaciones, mejor dicho, cuando vuelve, porque se acuerda de mí y me trae siempre pimientos cultivados en un huerto ecológico, asados sobre una chapa que calienta un fuego de leña y pelados a mano ¿alguien da más? Sí, ella misma. Vino también con una cesta hecha a mano debajo del brazo. No os creáis que soy tan materialista, también la echo de menos cuando se va.

Dejémonos de sentimentalismos y volvamos a lo que interesa. Una de las latas las aliñé con el clásico aceite, vinagre y sal y la otra se la incorporé a una receta de pan, que resultó ser una combinación espectacular.

I love it when Miriam goes to Ponferrada on holidays, or better, when she comes back, because she thinks about me and always brings me some organically grown peppers, roasted in a wood-fired oven and hand peeled. What more could you ask for? Well, in fact she also came back with a handmade basket. Do not think I am so materialistic, I also miss her when she’s gone.

Let’s forget about sentimentalism and let’s get back to what’s important. I seasoned the content one of the pepper tins with the typical oil, vinegar and salt, and I used the other one for a bread recipe which resulted in a spectacular combination.

Vamos con la receta

Para la «masa madre»:

  • 20 gr de levadura prensada fresca
  • 70 ml de agua
  • 120 gr de harina de fuerza

El resto de los ingredientes

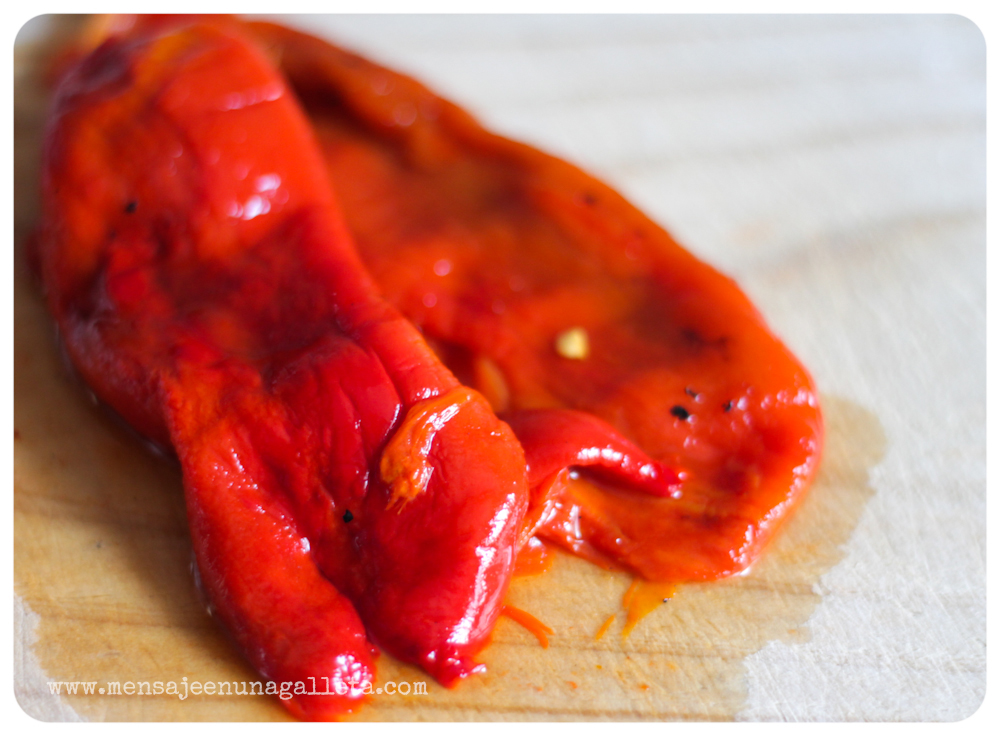
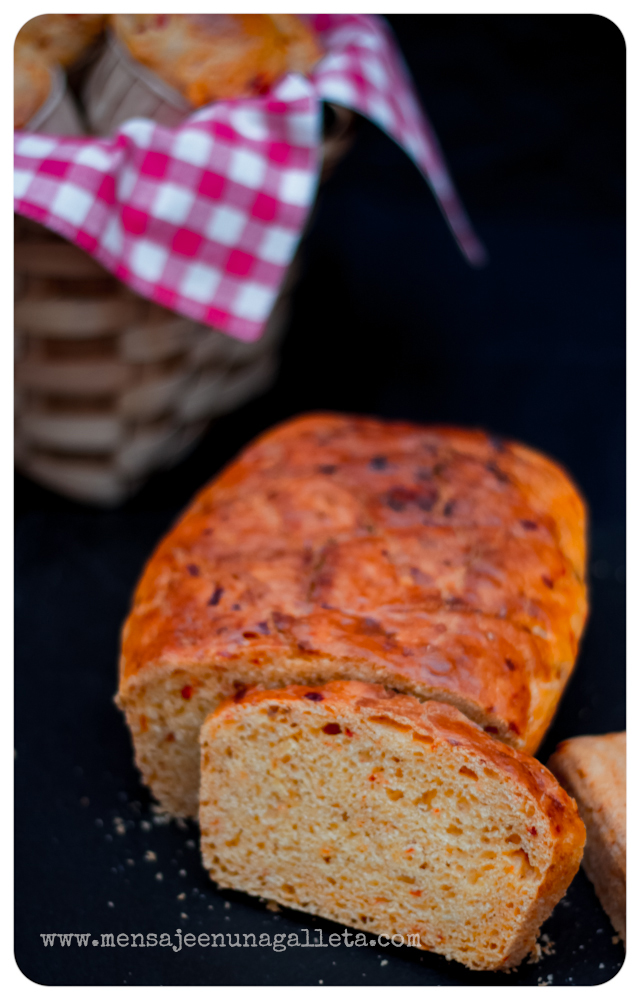
  • 100 gr de pimientos ecológicos, asados en horno de leña y pelados a mano de Ponferrada. ¿No tenéis? Bueno, pues podéis hacer el apaño con unos DIY de casa
  • 200 ml de leche entera (si incluís en esos 200 ml un chorrito del jugo de los pimientos, quedará todavía mejor)
  • 20 gr de aceite de oliva virgen extra. Otro tipo de aceite no, por favor.
  • 5 gr de azúcar
  • 10 gr de sal
  • 380 gr de harina de fuerza, nuevamente
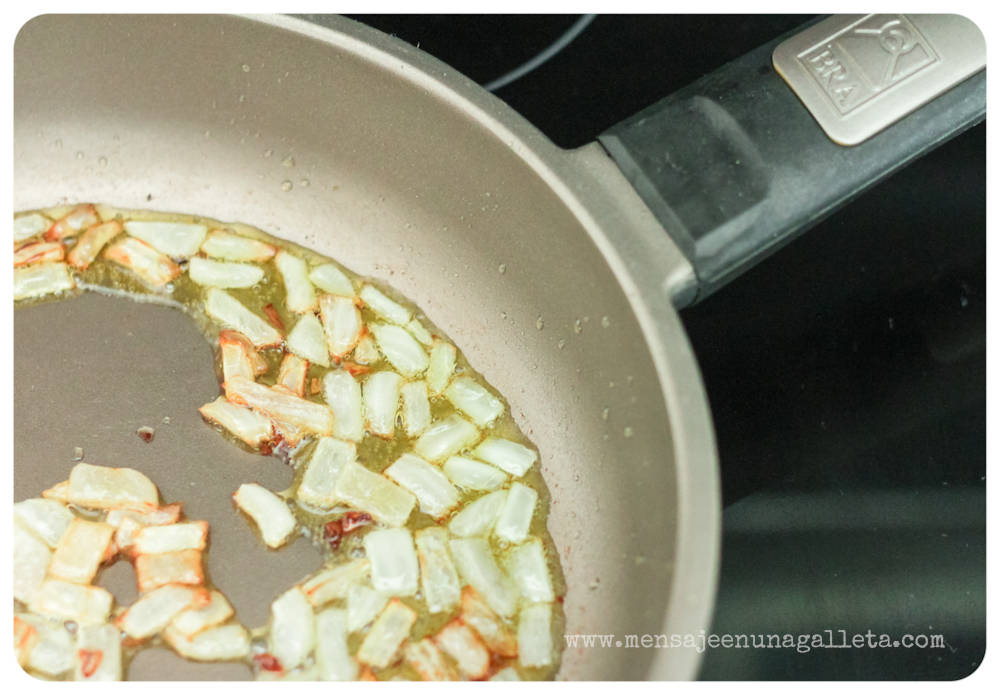
  • Opcionalmente, podemos incorporar un poco de cebolla rehogada al pan cuando incorporemos los pimientos

Let’s go with the recipe:

For the ‘sourdough’:

  • 20 gr fresh compressed yeast
  • 70 ml of water
  • 120 gr bread (strong) flour

Rest of ingredients:

  • 100 gr of organic peppers from Ponferrada, roasted in a wood-fired oven and hand peeled. Don’t you have them? Well, you can fix it using some DIY’ed at home.
  • 200 ml whole milk (and if you include in those 200ml a string of the peppers juice it will be even better).
  • 20 gr of extra virgin olive oil. Not any other oil, please.
  • 5 gr of sugar
  • 10 gr of salt
  • 380 gr of bread (strong) flour, again

Optionally, we can add some sautéed onions to the bread when we incorporate the peppers.

cebollarehogada

lospimientos

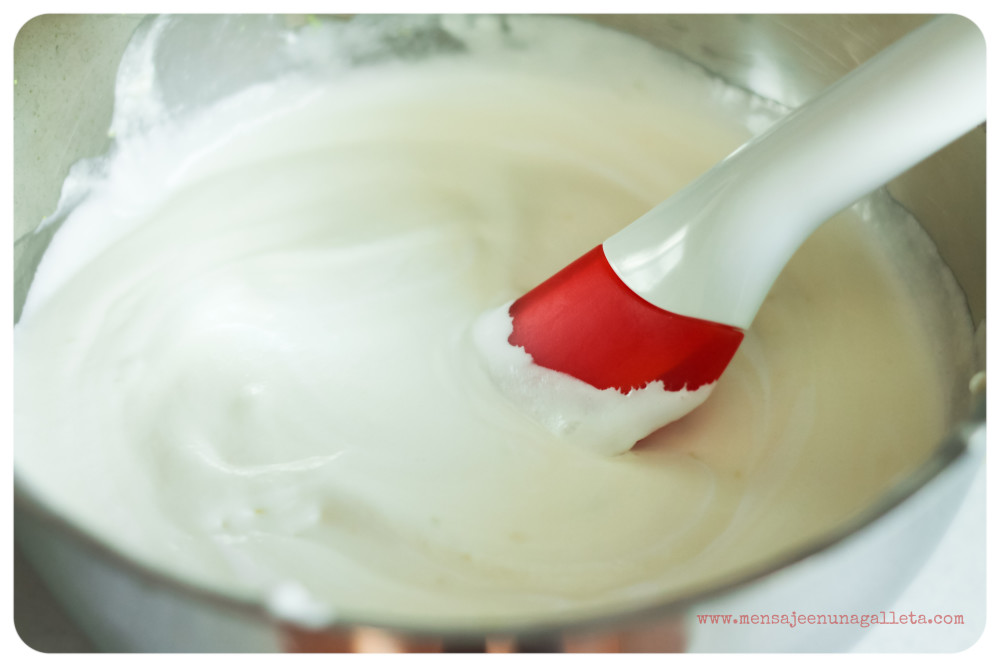
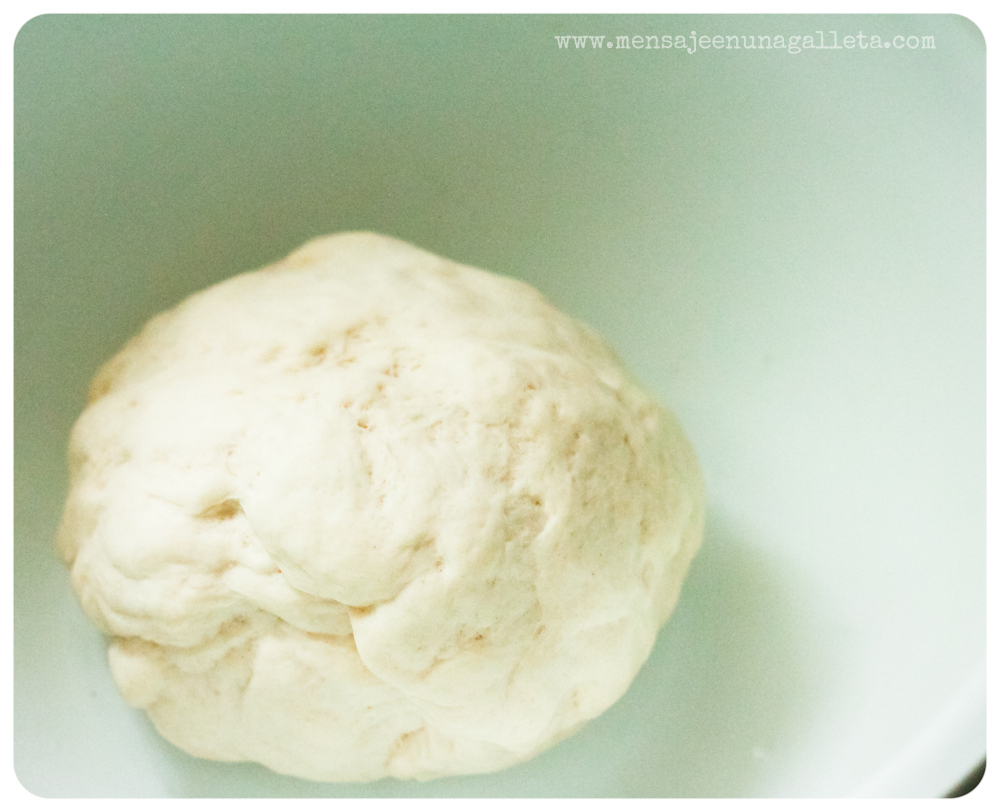
Empezamos con la «masa madre».

Trituramos en nuestro robot de cocina la levadura con el agua tibia y luego añadimos la harina. Mezclamos todo y amasamos durante un par de minutos. Dejamos reposar en un recipiente tapado con un paño húmedo durante unos 15 minutos aproximadamente. Veréis que pasado ese tiempo ha doblado su volumen.

We start with the ‘sourdough’.

Using our kitchen robot, grind the yeast with the lukewarm water and then we add the flour. Mix everything and knead for a couple of minutes. Let it stand in a bowl covered with a wet cloth for 15 minutes approximately. After that it will double its volume.

masamadre

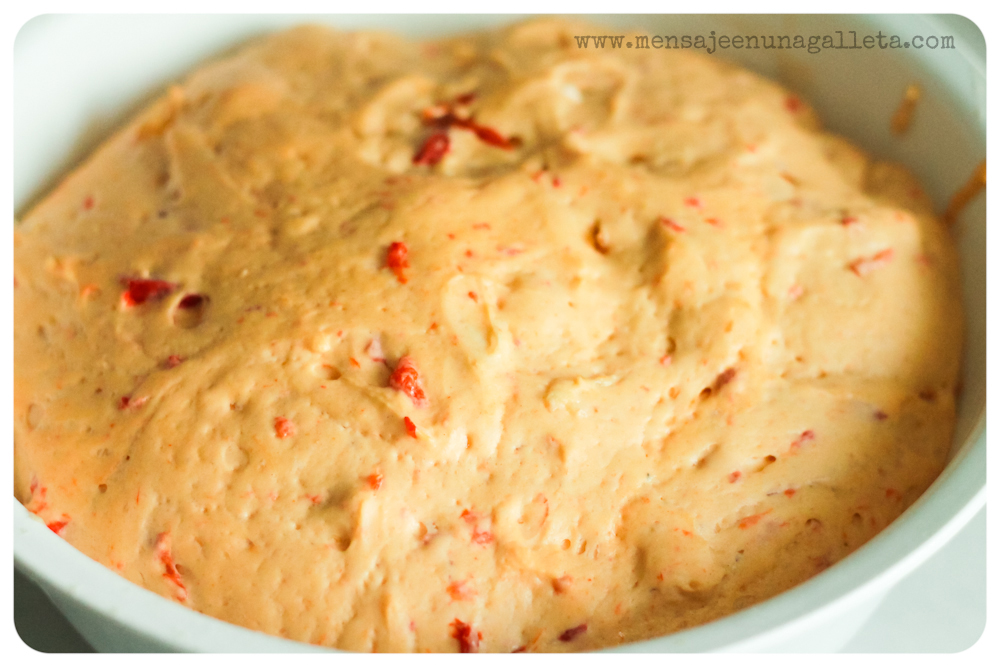
Seguimos con el resto de los ingredientes.

Mezclamos el resto de los líquidos, la sal y el azúcar. Incorporamos el resto de la harina y amasamos unos minutos.
Cortamos los pimientos en cuadraditos y los incorporamos a la mezcla anterior, a la que también añadiremos la masa madre y amasaremos hasta que esté todo bien incorporado. Dejamos reposar otra vez todo en un recipiente, hasta que suba de nuevo.

We keep working with the rest of ingredients.

Mix the rest of the liquids, salt and sugar. Incorporate the rest of the flour and knead for some minutes.
Cut the peppers in small dices and add them to the previous mixture, along with the sourdough, and knead until everything is fully and properly incorporated. Let everything sit until it rises again.

masaconpimientos

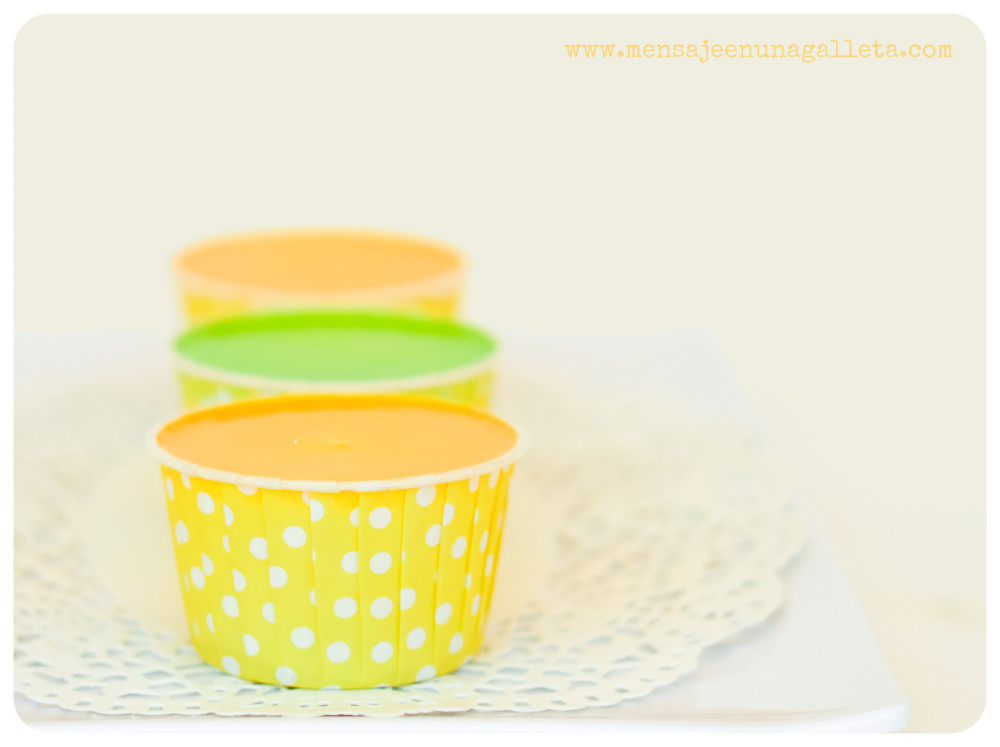
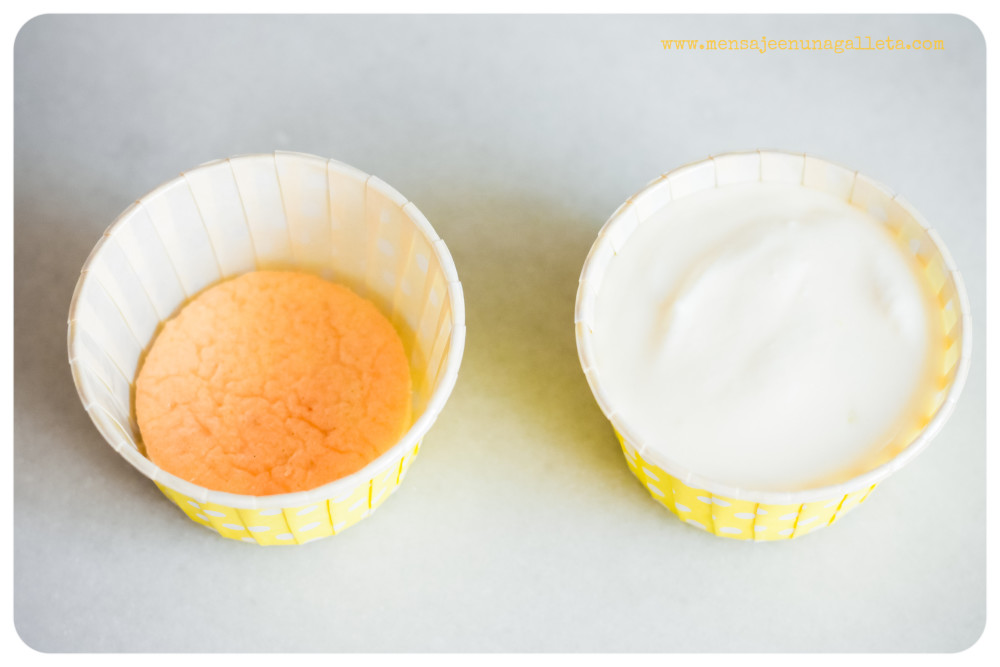
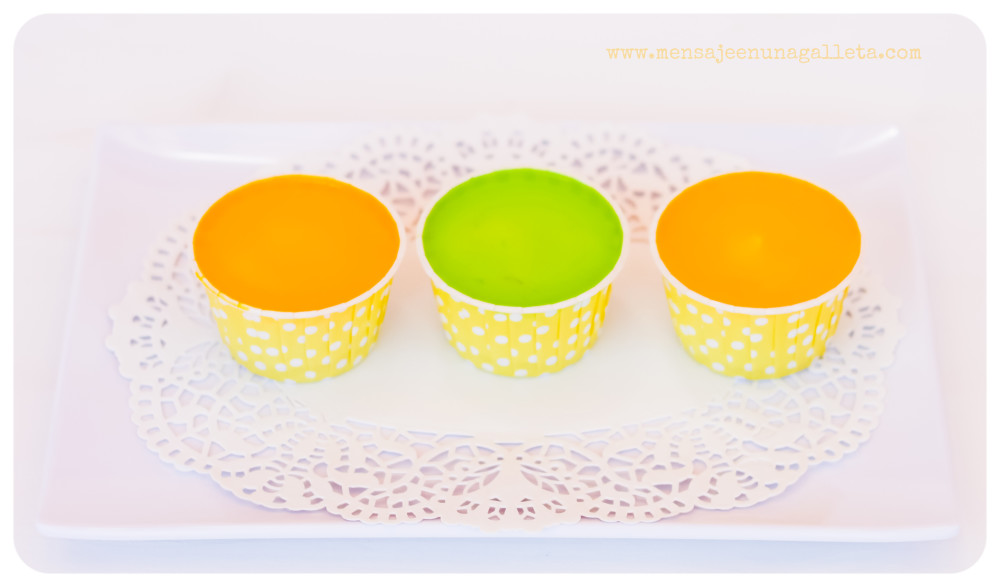
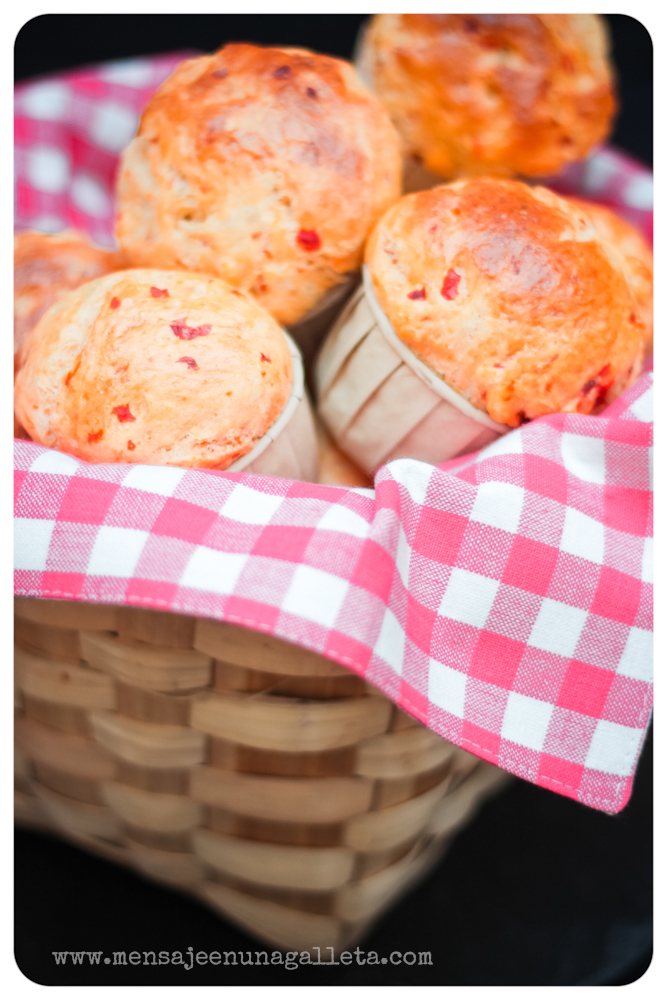
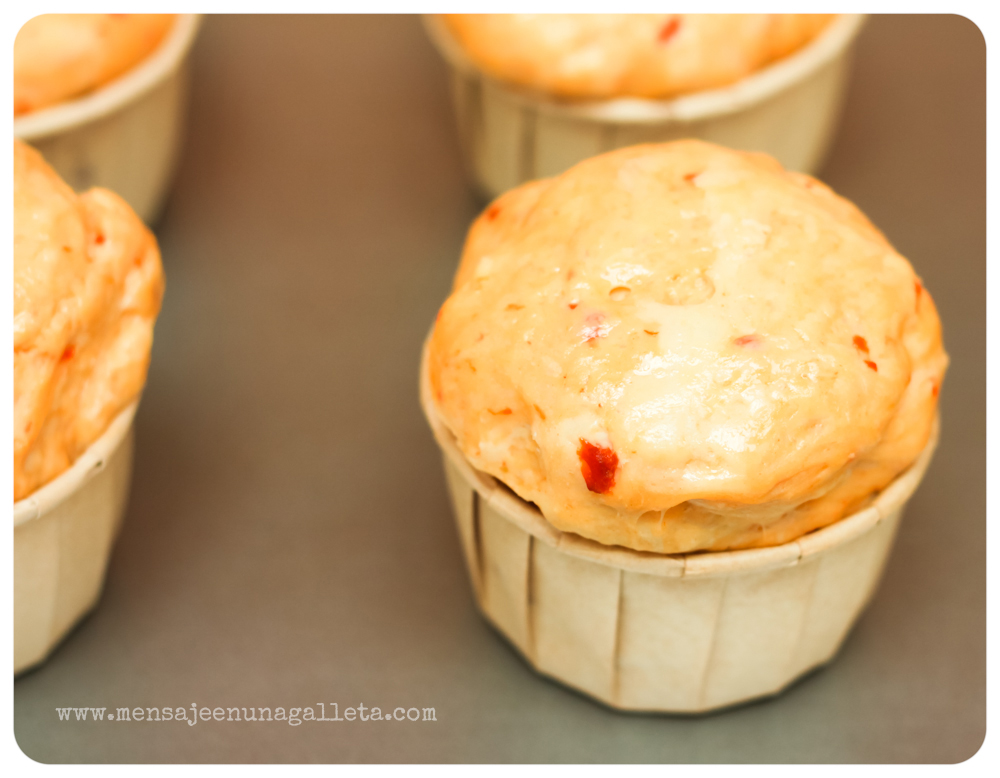
En ese momento repartimos la masa en los recipientes donde queramos hornearla (si es que queremos que vaya dentro de alguno), pintamos con huevo para que queden más bonitos cuando se cuezan y dejamos que suban otra vez (no tardará mucho)

In that moment we distribute the dough in the moulds or liners we want to bake it in (in case we want to use them), brush each piece of dough with a beaten egg so they look nicer when baked and let them rise again (this time it will not take long).

panesantesdelhorno

Mientras, precalentamos el horno a 200 grados, con calor arriba y abajo y el ventilador puesto. Es conveniente añadir humedad durante la cocción para que el pan quede más tierno. Lo que hago es poner la rejilla a mitad de altura donde coloco una bandeja más pequeña y abajo pongo la bandeja de asar del horno llena con agua.

Atención: Mucha precaución cada vez que vayáis a abrir la puerta del horno, el vapor de agua quema mucho (ojalá alguien me lo hubiera dicho a mí)

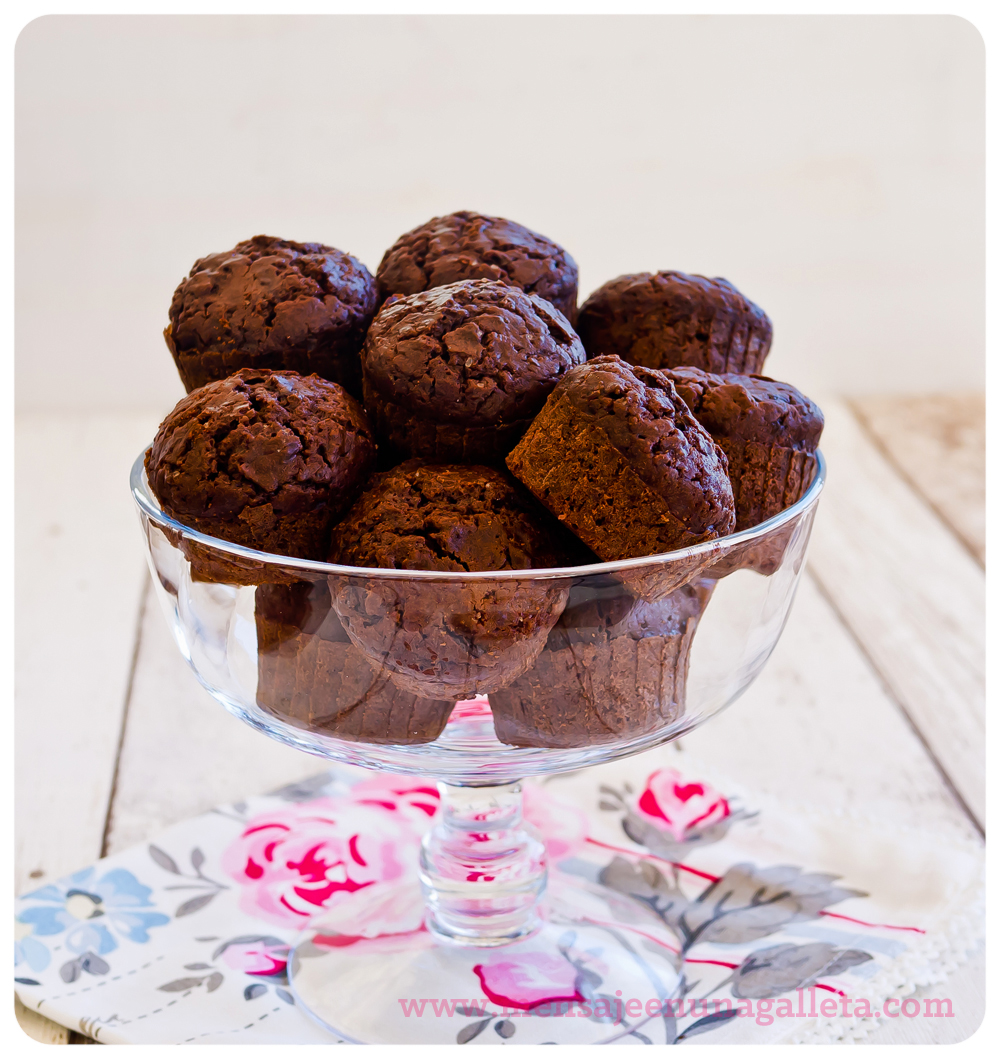
Tras tomar todas las precauciones del mundo, metemos nuestros queridos proyectos de pan en el horno. Si van en cápsulas de cupcakes, estarán dentro 10 minutos.

In the meantime, preheat the oven to 200ºC, heat above and below and fan on. It is convenient to add some humidity during baking so the bread is more tender. What I do is to place the oven rack in the middle of the oven and the tray with the bread on it, and in the bottom I place the roasting tray filled with water.

Attention: be very careful every time you open the oven, the water steam burns a lot (I wish somebody had warned me).

After taking all the precautions in the world, put our dear bread projects in the oven. If you bake them in cupcake liners they will be ready in 10 minutes.


cupcakespan

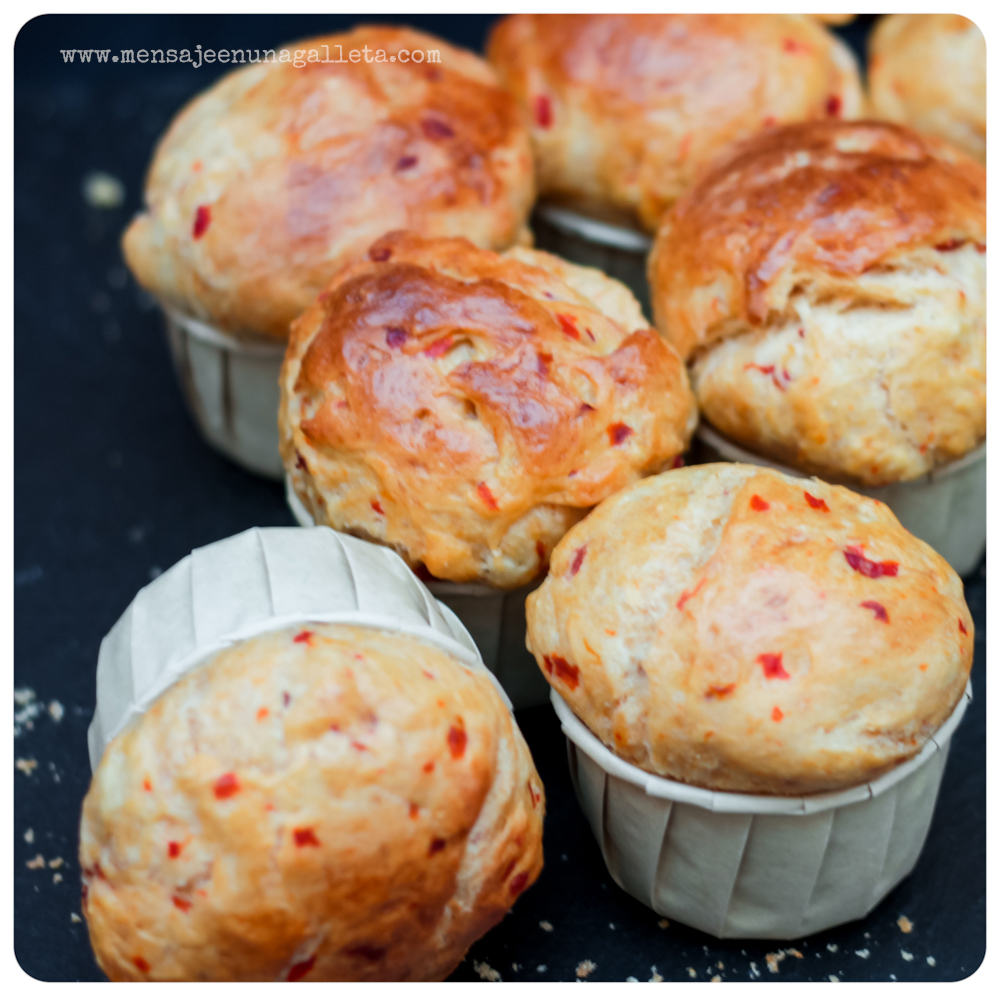
Si van en un molde grande, unos 25 o 30.

If you use a bigger mould or pan, in 25-30 minutes.

pangrandeycesta

Preparaos para el olor tan maravilloso que perfumará vuestras casas.

Get ready for the wonderful smell at home.

Un beso grande, Estíbaliz.

A big kiss, Estíbaliz.

Un millón de gracias como siempre a Gloria.

En otoño, nuevo taller para La tallerería: ¡Cupcakes para comer! This autumn, a new online workshop in La tallerería: Cupcakes to eat!

chocolateymascarpone2

Para hacer cupcakes con los ingredientes que encontráis en el supermercado del barrio o que ya teníais en la despensa, sin complicaciones ni ingredientes raros, para que os los comáis de principio a fin. Después de la exitosa experiencia con el taller on line de macarons, no había nadie mejor para impartirlo que nuestra Belén de Cupcakes a gogó, haciendo honor a su nombre.

The idea is that you can bake cupcakes with the ingredients you find in your local supermarket or those you already have in you pantry, without complications or funny ingredients; cupcakes you can eat entirely. After the successful experience with the macarons online workshop, we could not think of anyone better to give the workshop than our Belén from Cupcakes a gogó, living up to her name.

¿Un ejemplo? Unos cupcakes de chocolate, mascarpone y Huesitos. La receta de la masa se la hemos robado a Belén del taller, para que la vayáis probando:

Ingredientes para la masa

80 gr de harina de repostería bizcochona

20 gr de cacao puro Valor

120 gr. de azúcar

100 gr de mantequilla a temperatura ambiente

2 huevos grandes

1 cucharada de aroma de vainilla (o de vainilla en pasta)

An example? Some chocolate, mascarpone and Huesitos cupcakes. We have stolen the batter recipe from  the workshop, so you can try it out:

Ingredients for the batter:

80 gr cake self-rising flour 

20 gr pure cocoa powder

120 gr. granulated sugar

100 gr butter, room temperature

2 eggs (L)

1 tbsp of vanilla flavour or paste

Ingredientes para la crema

250 gr de queso mascarpone

50 gr de azúcar glas (si tenéis icing sugar, mejor)

1 cucharadita de vainilla en pasta o un par de  vainas de vainilla

1 barra de Huesitos para adornar (y comer posteriormente)

Ingredients for the frosting

250 gr of mascarpone cheese

50 gr of icing sugar

1 tsp of vanilla paste or a couple of vanilla beans

1 Huesitos bar to decorate (and eat afterwards)

huesitos

Elaboración

Mezclamos la mantequilla con el azúcar hasta formar una crema, añadimos los huevos y la vainilla y mezclamos hasta que todo esté integrado. Después añadimos el cacao y la harina y mezclamos todo de nuevo. Llenamos las cápsulas de los cupcakes por la mitad y los metemos en el horno durante unos 20 o 25 minutos a 170 grados.

Mientras tanto elaboramos la (sencillísima) crema de mascarpone, batiendo el queso hasta que forme una crema, solo lo justo, añadimos el azúcar y la vainilla hasta que estén completamente incorporados. Lo metemos en una manga pastelera  y lo metemos en el frigo para que coja cuerpo. Cuando todo esté completamente frío, adornamos los cupcakes con la crema usando la boquilla que más nos guste y repartimos los trocitos de huesitos por encima para adornar.

Elaboration

Mix butter and sugar until well blended and creamy, add the eggs and vanilla and mix until fully integrated. Then add the cocoa and the flour and mix again. Fill the cupcake liners about half way and bake them for 20-25 minutes, 170º.

In the meantime, we elaborate the (very easy) mascarpone cream, whipping the cheese until it’s creamy, then add the sugar and vanilla and whip until they are fully incorporated. Fill a pastry bag with the cream and keep it in the fridge so it hardens a bit. When it is completely cold, we decorate the cupcakes using the tip we like the most and garnish with some pieces of Huesitos.

chocolateymascarpone1

Por cierto, os recordamos que tenemos en marcha “El gran juego fotográfico del verano” en Instagram. El premio son tres plazas en los talleres de La tallerería: “Galletas decoradas”, “Macarons al milímetro” y otra en el taller de “Cupcakes para comer”. ¡No queremos que se quede ninguna foto sin subir!

Y si queréis saber más sobre el nuevo taller, aquí tenéis toda la información.

No dejaréis ni las migajas.

By the way, we remind you that we have launched on Instagram ‘The grand photo competition of the summer’. Prizes are three places, one on each of the following online workshops in La Tallerería: ‘Decorated cookies’, ‘Macarons to the millimetre’ and ‘Cupcakes to eat’. We want you to upload all your summer pictures!

And if you want to know more about the new online workshop, here you can find all the information.

You will eat it all up.

Un beso / Kisses

Miriam y Estíbaliz

PD: Thank you very much, Gloria


Home made

fotoportadamousse

Hace unos días se plantó mi hermana en mi casa con una tonelada de limones, sin exagerar.
A few days ago, my sister showed up at home with a ton of lemons, without exaggeration.

muchoslimones

¡Gracias, qué bien me vienen!… Madre mía ¿y ahora qué hacía yo con tanto limón? Tenía muchas posibilidades: a rodajitas acompañando a la ansiada coca-cola fresquita del mediodía, exprimiéndolos encima del pescado a la plancha, en la pechuguita de pollo vuelta-y-vuelta, en una ensalada espartana… Las ideas para usarlos en las recetas de cocina salada -y menos calórica- se agotaban, ya sólo me quedaba pasarme al lado oscuro, al dulce, porque me seguía sobrando aún media tonelada de limones. Así que di el paso, abrí el libro de recetas de Postres Caseros de Amanda Laporte y me puse a hacer su receta de mousse de limón ¡no iba a dejar que se estropearan esos limones!

Thank you! Just what I wanted!… Oh my god, and what I was supposed to do with all those lemons? I had a lot of possibilities: to have them sliced with the cool and desired coke at midday, squeezed on top of the grilled fished, on the chicken breast rare done, on a Spartan salad…The ideas to used them in savoury recipes- therefore less caloric- became scarce, so I could only go into the dark side, the sweet one, because I still had half a ton of lemons. So I went ahead, opened the recipe book ‘Postres caseros’ by Amanda Laporte and started to make her lemon mousse recipe, I could not afford to spoil those lemons!

IMG_1423-2

La receta está compuesta por tres capas: la base, que es un “falso” bizcocho, la propia mousse y una capa de gelatina.
The recipe has three layers: the base, which is a ‘false’ cake, the mousse itself and a jelly layer.

Vayamos con los ingredientes:

Para la mousse

5 hojas de gelatina (esto no engorda)
Ralladura de un limón (uno menos ¡bien!)
125 ml de zumo de limón (aquí se van otros cuantos)
2 claras de huevo (últimamente con el taller de macarons escasean)
350 ml de nata para montar (llegan las calorías)
100 gr de azúcar (de perdidos, al río)

Para la capa de gelatina que va en la parte superior
2 cucharadas de azúcar (¡qué más da!)
5 cucharadas de zumo de limón
La corteza de otro limón rallada
Colorante amarillo (se me fue la mano, sí), aunque también usé un verde eléctrico
2 hojas de gelatina

Let’s go with the ingredients:
For the mousse

5 jelly sheets (this is non fattening)
Lemon zest (one less, great!)
125 ml lemon juice (here we use some more)
2 egg whites (lately, with the macaroon workshop they are scarce)
350 ml whip cream (here are the calories)
100 gr sugar (in for a penny, in for a pound)

For the jelly layer on top

2 tbsp of sugar (we don’t care anymore!)
5 tbsp lemon juice
The zest of 1 lemon
Yellow food colouring (I went overboard with it, yes), I also used electric green.
2 jelly sheets

Vamos con la (super fácil) elaboración

Introducimos la gelatina en agua fría para que se hidrate durante unos 5 minutos. Mientras tanto, calentamos un poco del zumo de limón en un cazo. Escurrimos la gelatina y la mezclamos con el zumo caliente y luego con el resto del zumo para que se vaya enfriando.
Por un lado montamos la nata con la mitad del azúcar y la mezclamos con el zumo y la ralladura del limón. Por otro, montamos las claras a punto de nieve, añadimos el resto del azúcar y terminamos de batir. Agregamos las claras montadas a la nata y removemos con una espátula con cuidado, no queremos perder esas valiosas burbujas de aire que van a dar a la mousse su ligereza (no nos engañemos, sigue engordando).

And now, the elaboration:

Introduce the jelly in cold water to hydrate for 5 minutes. In the meantime, heat a bit of the lemon juice in a saucepan. Drain the jelly and mix it with the warm juice, then add the rest of the juice so it starts to cool down.
Whip the cream with half of the sugar and mix it with the lemon juice and zest, then whisk the egg whites until you get stiff peaks, add the remaining sugar and finish whisking. Add the egg whites to the cream and stir carefully using a spatula; we do not want to lose those precious air bubbles which will give the mousse its lightness (let’s face it, it’s still fattening).

IMG_9451

Ahora cortamos unos círculos de la plancha de bizcocho, que ya tendremos lista a estas alturas, y los introducimos en unos moldecitos monos como estos que compramos en Vainilla y Caramelo (ya habréis buscado en su tienda el tesoro MEUG de esta semana ¿verdad?).

Now we cut some circles from the sheet of sponge cake which we’ll have ready by now, and introduce them in some cute moulds like these we bought in ‘Vainilla y Caramelo‘ (I assume you have already searched for the MEUG treasure hidden in their shop this week, right?)

rellenandovasitos

No son unos moldes cualquiera porque están plastificados por dentro, podemos echarle lo que queramos que el estampado seguirá inmaculado.
They are not just any moulds because they are laminated inside, so no matter what we pour in them, the pattern will remain intact.

vasitoplastificado

Con nuestros moldes rellenos nos dirigimos a la nevera y los dejamos ahí dentro un par de horitas para que la gelatina haga su función.
Llega el turno de la gelatina. Calentamos en un cazo el azúcar con las 5 cucharadas de zumo de limón, más 5 cucharadas de agua y la ralladura. Dejamos cocer un par de minutos, añadimos las 2 hojas de gelatina que nos quedaban y que también habremos tenido hidratando. En este punto dividimos la mezcla en dos, a una le añadiremos el colorante amarillo y a la otra, el verde. Cuando esté todo tibio, añadimos la mezcla a los vasitos de mousse. Metemos los vasitos de vuelta a la nevera para que cuaje la gelatina.
¡Precioso!

With our moulds already filled we take them to the fridge where we’ll leave them for a couple of hours so the jelly works its magic.
And it’s turn for the jelly. In a saucepan, heat the sugar with 5 tbsp of lemon juice, 5 tbsp of water and the lemon zest. Let it boil for a couple of minutes and add the 2 remaining jelly sheets, which we have also hydrated. At this stage we divide the mixture into two parts, adding yellow food colouring to one of them and green to the other. When everything is lukewarm we add the mixture to the mousse cups, and put them back in the fridge so the jelly can settle.
Beautiful!

IMG_9472

primerplanomoussse-2

Estefanía, la próxima vez me traes lechugas. Estefanía, next time, please bring me some lettuce.

Un beso/ Kisses,
Estíbaliz

I would like to thank Gloria once again, not only for her appreciated translations, but for her support, encouragement and friendship.

¡Échale Valor! Give it some Valor!

sinvalor-2

Desde el año pasado mis hijas asisten en julio por las mañanas a un campamento de verano que las tiene completamente enamoradas, tanto, que no quieren que llegue el sábado. ¡Gracias Nany poppins!

Y cuando llega, me ponen a hornear para tener algo rico que llevarse de desayuno. De momento la primera posición es para estos pastelitos de dos chocolates Valor, muy energéticos (sí, engordan), deliciosos, jugosos y que se comen en dos bocados, que es lo que a ellas les interesa.

Since last year, in July and during the mornings, my daughters attend a summer camp they really love. They like it so much that they do not want Saturday to come. Thanks Nany poppins!

And when it does, they make me bake so they can have something nice for breakfast. For the moment, the first place is for these small cakes made with two Valor chocolates, very energetic, (yes, they fatten you up), delicious, moisty, that you can have in two bites, which is what they’re really interested in.

Nany Poppins

Ingredientes:

– 90 gramos de mantequilla, pero con 100 están más ricos, yo les pongo 100.
– 6 cuadraditos de chocolate Valor postres. 120 gramos.
– 220 gramos de harina o menos.
– 175 gramos de azúcar moscabado
– 40 gramos de cacao puro en polvo, 50 si de verdad os gusta el chocolate. Estíbaliz, tú ponle sólo 40.
– 1 cucharadita y media de impulsor, para entendernos “levadura Royal”
– ½ cucharadita de sal, yo le pongo una entera.
– Toda la vainilla que nos apetezca echarle. Yo le pongo 15 ml de una buena y en pasta.
– 2 huevos ecológicos pequeños. Usad huevos ecológicos, cuestan el doble, pero tienen 10 veces más sabor. Y son cien veces más sanos.
– 300 ml de buttermilk que, como no tendréis, yo tampoco tengo, usad leche entera y añadidle el zumo de medio limón y esperad 10 minutos.

Ingredients:

– 90 grams of butter, but with 100 they’re nicer, I use 100.
– 6 Valor Desserts chocolate pieces. 120 grams.
– 220 grams of flour (more or less).
– 175 grams of muscovado sugar
– 40 grams of pure cocoa powder, 50 if you really love chocolate. Estíbaliz, you just have to use 40.
– 1.5 teaspoon of baking powder.
– ½ teaspoon of salt, I add a whole teaspoon.
– All the vanilla we feel like adding. I use 15ml of a good vanilla paste.
– 2 free-range S eggs. Use these kind of eggs, they are twice as expensive but they are 10 times tastier. And 100 times healthier.
– 300 ml of buttermilk which, like me, you will not have. Use whole milk and add the juice of half a lemon and wait for 10 minutes.

convalor1-2

Elaboración:

Mezclamos todos ingredientes sólidos en un cuenco grande y reservamos.
Derretimos la mitad del chocolate junto a la mantequilla y la otra mitad la picamos a cuchillo en trozos no muy pequeños. Mezclamos el huevo ligeramente batido con el buttermilk y la vainilla y con la mezcla de chocolate y mantequilla, movemos un poco hasta obtener una mezcla uniforme.
Integramos sólidos y líquidos, y cuando digo integrar me refiero a remover con una espátula lo justo, si nos pasamos los pastelitos no tendrán la misma textura.

Horneamos 15 minutos a 180º y después de esto empezamos a vigilarlos de cerca, porque si nos pasamos pueden quedarnos secos y tienen que quedar muy jugosos.

Elaboration:

We mix all the solid ingredients in a big bowl and set aside.
Melt half of the chocolate with the butter and chop the other half in not very small pieces. Mix the egg, slightly whisked, with the buttermilk, vanilla and the chocolate and butter mixture, and stir a bit until you get a smooth batter.
Integrate the solid and liquid ingredients, and when I say integrate I mean to stir with a spatula just the necessary, as if we overdo it, the cakes will not have the same texture.

Bake at 180º for at least 15 minutes. After that, you have to be very careful as they can easily lose moisture and get dry.

pordentro-2

Ya os contaré lo que horneamos el próximo fin de semana.
I will let you know what we bake next weekend.

Un beso gordo.

A big fat kiss.

Y hoy en castellano, muchísimas gracias Gloria por tus fantásticas traducciones.